
(1) Downloading LaserGRBL software
LaserGRBL is one of the most popular DIY laser engraving software in the world, LaserGRBL download website: https://lasergrbl.com/download/
(2) Double-click the software installation package to start the software installation, and keep clicking “Next” until the installation is complete.
- The software supports users to add custom buttons, you can add custom buttons in the software according to your usage. We recommend the official Custom Buttons from LaserGRBL. Custom buttons download address: https://lasergrbl.com/usage/custom-buttons/. As shown in the figure.
Load the custom buttons into the LaserGRBL software.
- In the LaserGRBL software, right-click on the blank space next to the bottom button, as shown in the following picture.
2. Import the custom button, then selects the custom button zip file downloaded to import and keep pressing Yes (Y) until no window pops up.
(2)USER INTERFACE
- Connection control: here you can select the serial port and proper baud rate for connection, according to GRBL firmware configuration.
- File control: this show the loaded filename and engraving process progress. The green “Play” button will start program execution.
- Manual commands: you can type any G-Code line here and press “enter”. Commands will be enqueued to the command queue.
- Command log and command return codes: show enqueued commands and their execution status and errors.
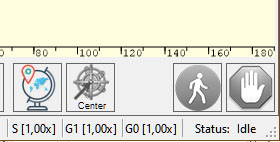
- Jogging control: allow manual positioning of the laser. The left vertical slider control movement speed, right slider control step size.
- Engraving preview: this area shows the final work preview. During engraving, a small blue cross will show the current laser position at runtime.
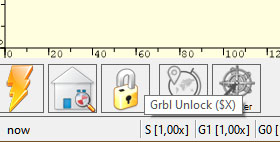
- Grbl reset/homing/unlock: these buttons submit soft-reset, homing, and unlock commands to grbl board. On the right of unlock butto,n you can add some user-defined buttons.
- Feed hold and resume: These buttons can suspend and resume program execution sending Feed Hold or Resume command to grbl board.
- Line count and time projection: LaserGRBL could estimate program execution time based on actual speed and job progress.
- Overrides status and control: show and change actual speed and power override. Overrides is a new feature of grbl v1.1 and is not supported in the older version.
(3) CONNECTING TO THE ENGRAVER
Step 1: ensure COM port is recognized by the OS
Is it necessary that your Windows OS recognize your engraver as a serial COM port once connected. Depending on the type of controller board this port may appear in the computer’s device manager with the name “USB-SERIAL CH340” or “USB Serial Device” or something else.
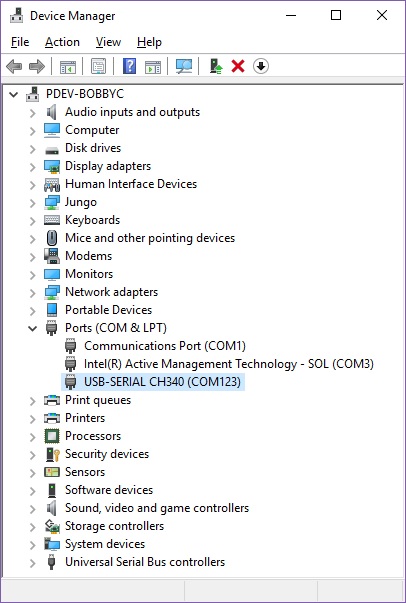
The name with which it appears in the device manager strictly depends on the type of machine.
If no name appears, or if a device with an error symbol appears, you probably need to install a driver. Refer to the manufacturer’s instructions to find out which driver to install.
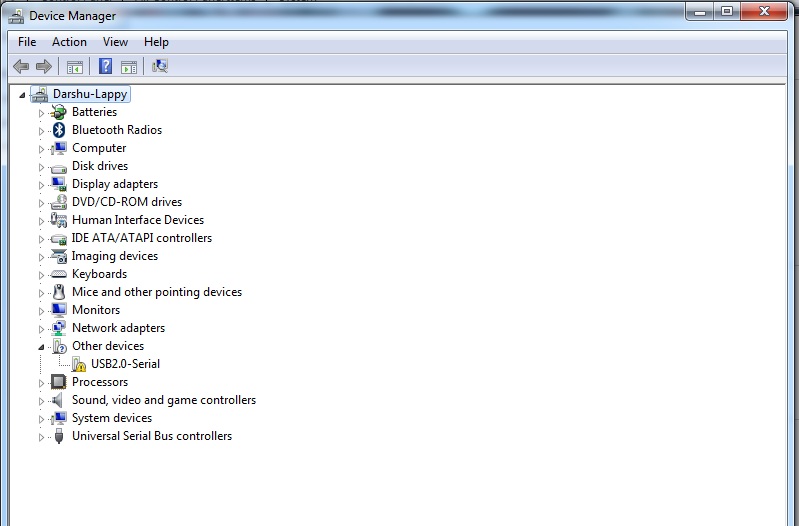
Usually the most common controller board use the CH340 chip.
Google for “arduino CH340G” if your system does not recognize serial port.
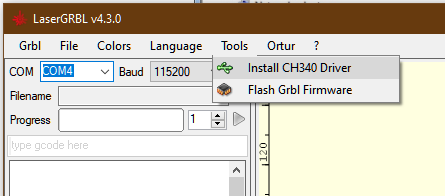
Is it also possible to install CH340 driver with LaserGRBL from “Tools” menu:
Please note: although most of the engraver use the CH340 driver there are some models that do not use it: refer to the manufacturer’s instructions to find out which driver to install.
Step 2: connect with LaserGRBL
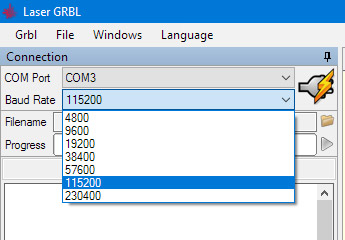
LaserGRBL constantly checks for COM ports available on the machine. The list of ports allows you to select the COM port which your control board is connected on.
This port number is the same shown near the COM port in device manager.
Please select the proper baud rate for the connection according to your machine firmware configuration. Most common speed is 115200, older controller sometime use 57600.
When connected to proper port grbl reply with “welcome message” showing Grbl firmware version.
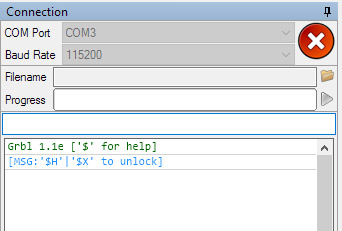
On the bottom-right of the LaserGRBL interface you should read “Status: Idle”
If you see “Disconnected” or “Connecting” but no message come from the engraver, maybe you should change something in your COM port configuration.
Note that LaserGRBL only recognizes engraver that use the standard GRBL protocol, and cannot connect to other type of protocols.
If you see “Status: Alarm” it means that your board is in an alarm state. The machine is connected, and this state comes from the machine: it does not indicate a LaserGRBL problem.
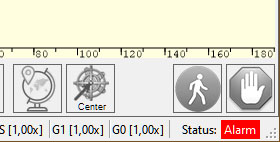
Usually, when the machine is in Alarm status it is necessary to execute the homing procedure (if the machine is equipped with mechanical limit switches) or simply press the padlock button to acknowledge the alarm.
Comments
0 comments
Please sign in to leave a comment.